

A restaurant floor plan decides more than where the tables go. It sets how far a server walks with a full tray, whether the host can see the door from the stand and how many guests you can seat on a Friday without chairs knocking into each other.
Many rooms are planned once, at build-out, and then run for years while the menu, the team and the guests change. This guide walks through how to design a restaurant floor plan step by step, the code numbers to check before you start, the layouts that suit different concepts and how a digital floor plan in your table management system keeps the layout useful once service starts.
What is a restaurant floor plan?
A restaurant floor plan is a scaled drawing of your space that shows where the entrance, waiting area, dining room, bar, restrooms and kitchen sit, and the routes guests and staff take between them. A good one is designed around how the room runs on a busy night.
In practice, most restaurants work with two versions of the same plan:
- The build-out plan: drawn to scale by an architect, a designer or the owner with a drafting tool. It shows walls, equipment, exits and measurements, and it’s the version your building department reviews before you open.
- The service floor plan: the version your host uses every night. It shows table numbers, seat counts and server sections instead of exact measurements, and in most restaurants it lives in the reservation system.
The steps below start with the build-out plan, because every decision in the service version depends on it.
How to design a restaurant floor plan
Whether you’re opening a new space or reworking a dining room you already run, the order of the work is the same.
1. Measure the space and check the code first
Start with accurate measurements of the room, including doors, windows, columns and anything you can’t move. Then ask your local building department which codes apply before you place a single table, because the code sets how many people the room can hold.
Most US jurisdictions base their rules on the International Building Code (IBC). Under IBC Table 1004.5, a dining area with tables and chairs is calculated at 15 square feet of net floor area per person, standing space at 5 square feet and a commercial kitchen at 200 square feet of gross area per person. That occupant load decides how many exits you need and how many guests you can legally seat, so it’s worth knowing before you commit to a layout.
Local codes can adopt a different edition or add their own changes, so treat these numbers as a starting point and confirm them with your building department.
2. Split the front and back of house
Decide how much of the space goes to guests and how much goes to the kitchen, prep, storage, dish and staff areas. A full-service kitchen cooking a long menu needs more room than a counter-service concept with a short one, so let your menu and service style set the split rather than a fixed ratio.
Then place the kitchen so food reaches the dining room by the shortest route, with the pass close to where servers pick up and the dish return out of guests’ sight lines.
3. Map how guests and staff move
Walk the plan the way a guest would: through the door, to the host stand, to a table, to the restroom and back out. Then walk it as a server carrying plates from the pass to the farthest table. Wherever those two routes cross, you’ll see bumped trays and guests waiting in a doorway on a busy night.
Accessibility sets the minimum width. The 2010 ADA Standards for Accessible Design require walking surfaces to be at least 36 inches wide, so any route a guest uses needs at least that much clear space. Measure it with the chairs pushed back the way guests actually sit, because a route that works with every chair tucked in can close up once the room is full.
4. Choose a seating mix that fits your covers
Your table mix decides who you can seat and how quickly. Two-tops that push together give the host room to build tables for larger parties, while booths are comfortable but fixed. Look at your reservation history for your most common party sizes and build the mix around them, so the host isn’t seating a couple at a four-top on a busy night.
Plan accessible seating at the same time. The ADA Standards require at least 5% of seating spaces at dining surfaces to be accessible, with table tops between 28 and 34 inches above the floor. It’s worth spreading those seats across the room, so guests who need them aren’t always seated in the same corner.
5. Number tables and draw server sections
Give each table a number that follows a logical path through the room, so a new server can find table 14 without asking. Then group tables into server sections that sit close together and carry a similar number of covers. This is the version of the floor plan your team uses every night, so it needs to make sense at a glance.
6. Test it in service, then adjust
A floor plan proves itself on a full night. Watch where guests wait, which tables get skipped and where servers cross paths, then move tables and redraw sections. Walk the team through any changes in your pre-shift meeting, especially before holidays and large events, when party sizes change.
Restaurant floor plan examples by concept
The steps stay the same across concepts, but what shapes the layout changes. Here’s how the priorities shift for the most common formats.
| Concept | What shapes the layout | What to watch |
|---|---|---|
| Fine dining | Fewer tables with more space between them, quieter corners and room for tableside service | Seats near the kitchen door or restrooms, which guests notice more at a higher check |
| Casual full service | A mix of two-tops, four-tops and booths, with tables that combine for larger parties | Combinations that leave a single two-top stranded at peak |
| Fast casual and counter service | The queue, the order point and the pickup area, with seating arranged around them | Lines that spill into the dining area or block the door |
| Bar-forward and lounge | The bar as the anchor, with high-tops, rails and standing room | Standing space counts at a different occupant load than seated dining (see step 1) |
| Private dining and events | Rooms or sections that can close off, with tables that adapt to different formats | Furniture changes between seatings that eat into turn time |
Restaurant floor plan makers and templates
For the build-out plan, most operators take one of three routes: hiring an architect or restaurant designer, using a drafting tool built for floor plans or starting from a free restaurant floor plan template. A restaurant floor plan maker lets you drag in walls, tables and kitchen equipment to scale, try a few layouts and export a plan you can share with a contractor or landlord. That’s the right tool when you’re planning a new room or a renovation.
Once the room is built, the plan you need changes. During service, nobody needs exact measurements. The host needs to see which tables are open, who’s sitting where and when the next table turns, and that’s the job of the digital floor plan in your reservation system.
How a digital floor plan helps during service
When you first outline a restaurant floor plan, you’re focused on optimizing your operations based on the way you set up your tables.
But a digital floor plan can do this every day. It can become a vehicle to track statuses and operate faster while in-service. How? By becoming your interface for reservation and seating management.
So when you evaluate table management software for your reservations, look for these capabilities:
- Seat your guests
- Call out a reservation’s meal status
- List out party names
- Track table spend
- Show server assignments
- Label turn times
- Flag upcoming reservation times
Seating your guests
When a party first arrives at the host stand, your host should be able to quickly drag and place the reservation onto an available table. This allows the host to document the seating assignment for other operations staff and then quickly seat the party without skipping a beat.
When you first outline a restaurant floor plan, you’re focused on optimizing your operations based on the way you set up your tables.
But a digital floor plan can do this every day. It can become a vehicle to track statuses and operate faster while in-service. How? By becoming your interface for reservation and seating management.
So when you evaluate vendors to manage your reservations, look for these capabilities:
- Seat your guests
- Call out a reservation’s meal status
- List out party names
- Track table spend
- Show server assignments
- Label turn times
- Flag upcoming reservation times
Seating Your Guests
When a party first arrives at the host stand, your host should be able to quickly drag and place the reservation onto an available table. This allows the host to document the seating assignment for other operations staff and then quickly seat the party without skipping a beat.
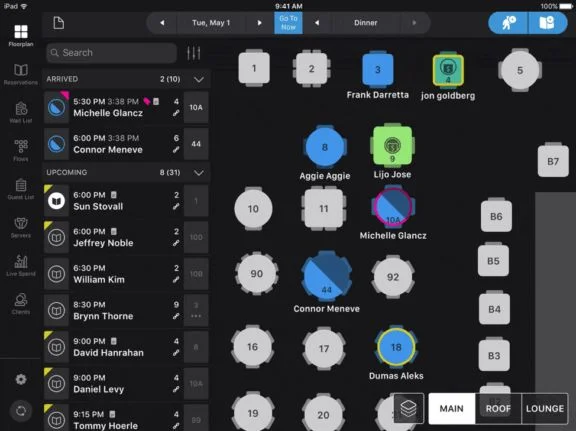
Calling Out a Party’s Meal Status
The human brain can process images in 13 milliseconds. That’s 0.013 seconds.
And it’s color, shapes, and orientation that help us do this.
When it comes to a restaurant floor plan, these things can call out important information at a glance, helping servers, hosts, maitre d’s, kitchen staff, and GMs to understand more about who’s seated at any given moment. The first of these is table status.
The most advanced seating management systems allow restaurant staff to double-click on a table to quickly update table status like seated, food served, paid, and left.
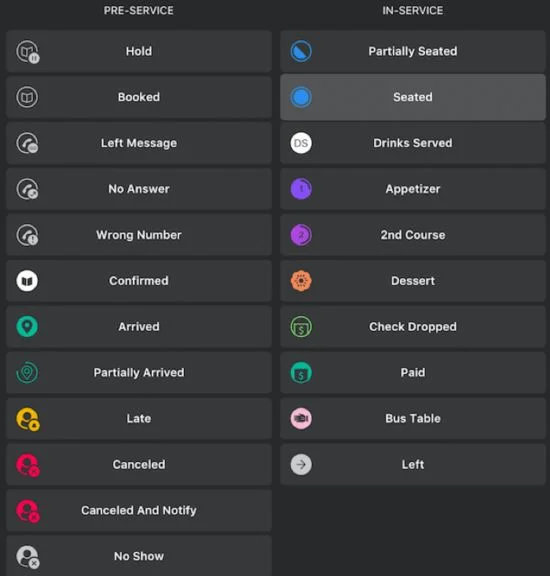
Even more interesting: Some platforms integrate with POS systems, updating table status in real-time, and automatically, when a check is dropped and then when it’s paid.
Get Your Demo Of SevenRooms Today To Get The Full Scoop of our Restaurant reservation system
Listing Out Guest Names and Easily Identifying VIPs
The best floor plans make it easy for waitstaff to see who’s seated across the entire floor.
They do this in two ways:
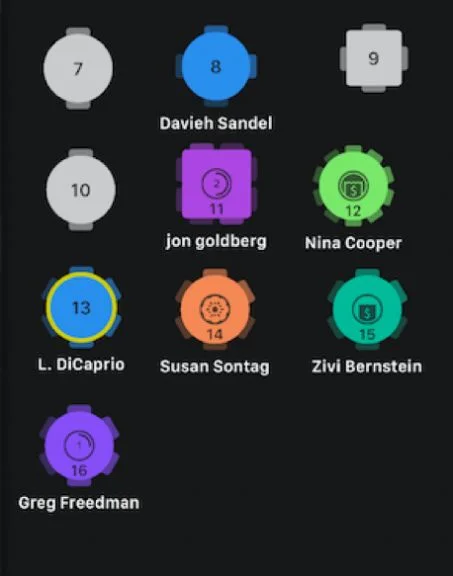
- Showing the name of the person who booked the reservation directly on the floor plan.
- Identifying VIP tables and ‘hot’ reservations with a colored outline on the table.
Here is an example of names with VIP tables outlined in yellow (in this case, Leo DiCaprio’s):
If you click into Leo’s table from the floor plan, you see this:
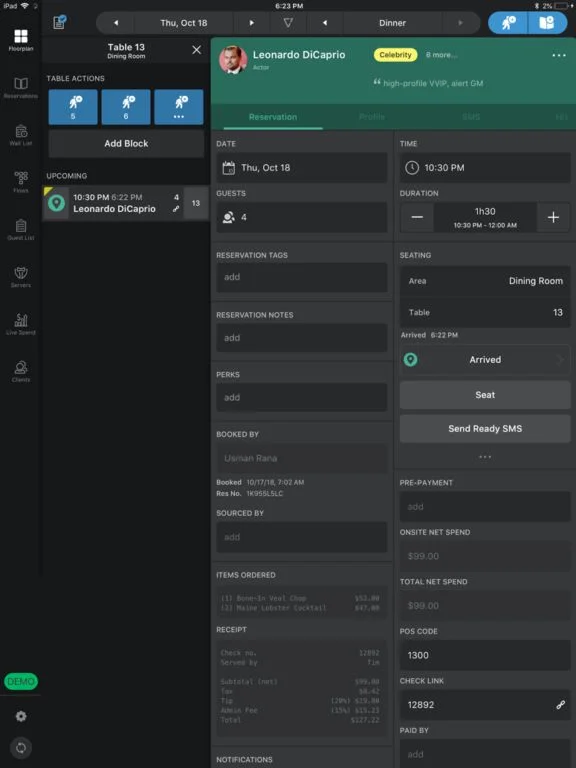
Which brings us to the next point. A floor plan should track each table’s spend in real-time.
Tracking Table Spend
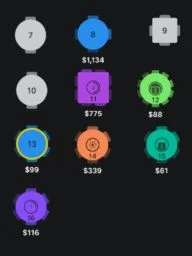
Let’s say you want to see how much each party that’s seated has spent during their reservation. You should be able to switch to a view of your floor plan that highlights that information for you.
For example, here’s what it looks like on the SevenRooms platform:
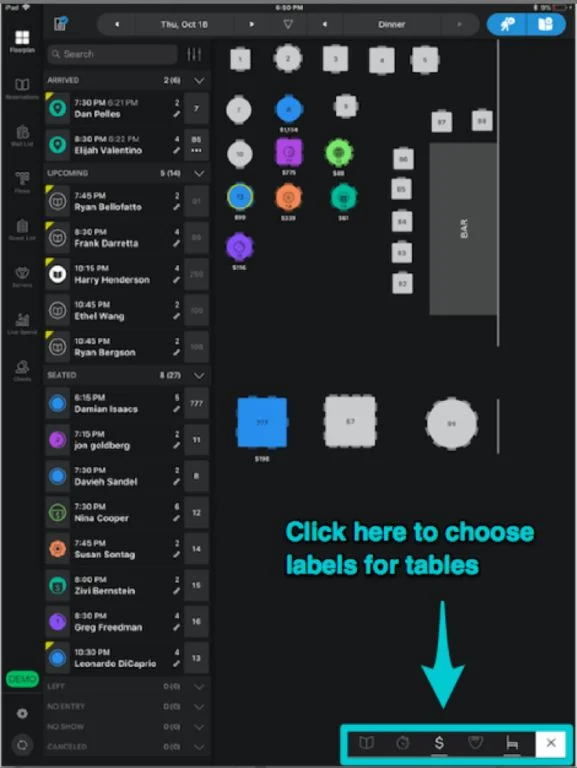
Users can click a button to expand to these label options to choose from. The dollar sign option switches to a live spend view that updates each table’s spend in real-time, pulling from the restaurant’s POS system.
Live spend helps in-service staff and managers, whether on-site or off-site, to better gauge shift revenue.
Often times, the floor plan links to a different report that organizes real-time table spend from highest to lowest spenders.

This is especially helpful for an owner or GM who wants to keep tabs on revenue as it happens — maybe even pop over to say hello to a high-spender who is a new face in the establishment.
Showing Server Assignments
Whether a guest at the host stand requests their favorite server, or a hostess wants to equally distribute party numbers to each server, you need to be able to quickly view server assignments.
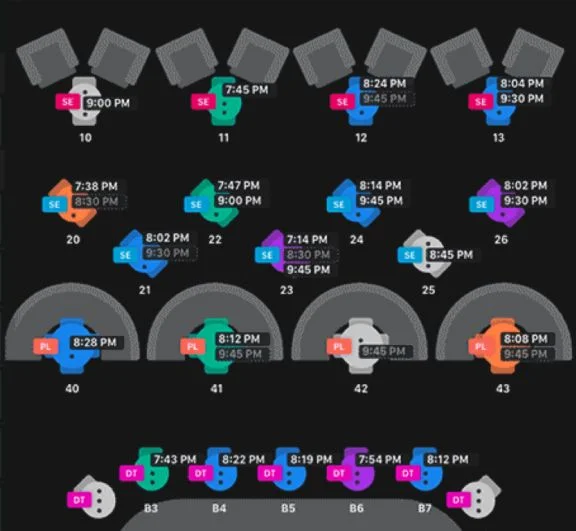
In this example, the pink “DT” tags on each table highlight server Danielle Thomas’ section:

If we pull back to look at the entire restaurant floor plan, you’ll see other server sections. Right now, there are two servers with the initials “SE” — Shelly Ennis and Sam Edgar (this is where color-coding comes in handy), as well as a “PL” for Peter Lewiston.
Labeling Turn Times
Let’s say a guest drops by your restaurant looking for a reservation later in the evening. You should be able to easily view upcoming reservation times and then click on a table that will open up later in the night to add a reservation right there.
SevenRooms allows you to do this in the view above. If a party of two wants a reservation for 8PM, you could assign them to table 11 because the turn time is set for 7:45. Learn more about how to automatically optimize your turn times to get more guests in the door with our free Revenue Management Guide.

Playbooks & Guides
Revenue Management: How to Make More Money From the Same Seats
Learn More
Remember These 5 Things When You Digitize Your Floor Plan
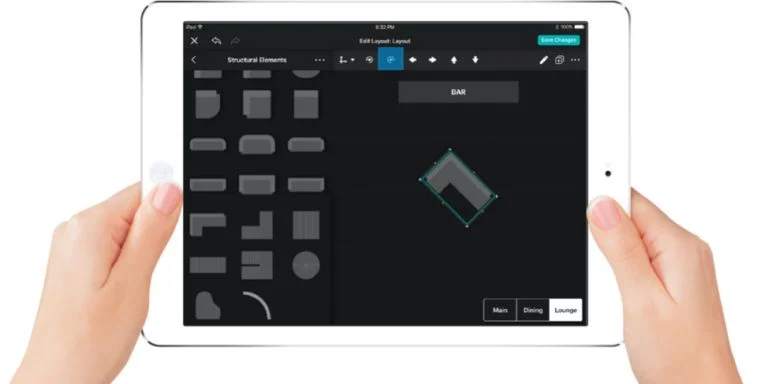
The following are quick tips to keep in mind as you think about making your restaurant floor plan digital:
1. Pick a vendor that lets you edit the floor plan yourself
You should be able to do things like create new tables, rotate them easily when you want to try a new layout, and add structures like a bar area.

2. Put Function Before Anything Else.
It’s more important for a digital floor plan to be functional than for it to be exactly to scale.
The fact is, your operations staff know the layout of your restaurant. They aren’t using the floor plan as a blueprint to see the layout of your restaurant as much as they are to update statuses.
For example: let’s say your tables actually sit in a line, but it’s hard for the labels to fit that way on the floor plan. It’s okay to have the tables be represented on a slant (see above).
Pro Tip: Make your table label fields the width of the longest label (whether it’s table number, server name, arrival time, etc).
3. Be Able to Attach Your Seating Inventory to Your Tables.
This makes it extremely easy for your host stand to add new reservations directly to your floor plan – whether it be walkins or changing a table assignment for an existing party.
4. Fit Your Entire Floor Plan On One Screen Using Toggles.
Maybe you include your upstairs in one view, outdoor area in another, and lower level in a third.
Whatever you do, you want to make it easy for your front-of-house staff to easily see the floor plan in one view, without having to swipe around to move their perspective.
If you can’t fit the full floor into one view, it’s easy to bundle seating areas into their own separate plans that you can use toggle buttons to quickly switch from one to another.
5. Include Chairs At Each Table So You Can See Seating Capacity.
If someone at the host stand needs to add a walk-in reservation or seat an arrival, it’s important to be able to quickly know how many covers each table can fit.
So in addition to showing whether a table is square, circular, or rectangular, you also need to see number of chairs and ability to combine tables.
SevenRooms covers everything above. Its table management floor plan runs on the same guest profiles as your reservations, so the names, VIP tags and spend on each table come from each guest’s history. When the room fills up, an AI-driven seating algorithm tests more than 10,000 table combinations every second to suggest the best table for each party.
“SevenRooms provides easy, user-friendly tools that help us maximize shift flows, manage seating, communicate with clients via SMS, and efficiently handle blocks and table combos,” says Devone Wise, Director of Operations at Mercer Street Hospitality.
Get a personalized demo to see how it works in your room
Restaurant floor plan FAQs
How do I create a floor plan for my restaurant?
Measure the space, check your local building code for occupant load and accessibility, split the front and back of house, map how guests and staff move and choose a seating mix that fits your most common party sizes. Then number the tables, draw server sections and test the layout during a busy service.
How much space does a restaurant need per seat?
Under IBC Table 1004.5, which most US building codes are based on, a dining area with tables and chairs is calculated at 15 square feet of net floor area per person. That sets the maximum number of people the room can legally hold, and many restaurants plan fewer seats than that for comfort and service. Confirm the numbers with your local building department.
What are the main areas of a restaurant layout?
Most restaurant layouts include an entrance and waiting area, the dining room, a bar or service stations, restrooms and the back of house, which covers the kitchen, prep, storage, dish and staff areas. The floor plan connects them with routes that keep guest paths and server paths apart where possible.
Can I make a restaurant floor plan for free?
Yes, free templates and drafting tools are enough to sketch a layout and test a few versions before you bring in an architect or contractor. For service, the floor plan in your reservation or table management system is usually the one your team relies on, because it shows live table status, guest names and server sections.
